Add Event Prefabs to GenvidSession
Events define interactions between viewers and the game. For example, viewers could click a “Cheer” button for a specific player, which you could then use to increase a popularity rating that influences the current game.
Events pass through a MapReduce system to avoid overloading your game with events sent from the viewers on your website.
On This Page
Engine Integration
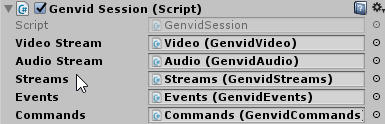
Drag and drop an Events prefab into GenvidSession as a child of the GenvidSession.
The GenvidSession has an Events section. Drag and drop your current Events prefab into this field.
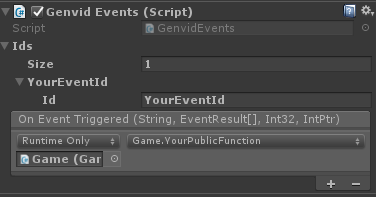
Change the Ids Size to the number of game data streams that you want to create.
Open one element and give it a unique name in the Id field.
In the script receiving the event, create a public function that takes the following parameters in this order:
- A string.
- An array of EventResult objects.
- A 32-bit integer.
- An integer pointer.
Drag and drop the object with your script into the On Event Triggered box and select your public function from the dropdown list.
In your public function you can use the information received from the event:
String: Id of the event.
Note: You’ll use this Id later when setting up your Events configuration and website calls.
EventResults[]: Results of the event.
Int32: Number of results received.
IntPtr: Specific pointer used for the callback.
The public function tells your game how to interpret events sent from viewers on your website. What events are available and what they do is completely up to you.
Web Integration
Open the
events.jsonfile available in theconfigfolder.Add this entry to the map section:
{
   "id": "NameOfYourEvent",
   "source": "userinput",
   "where": {"key": ["NameOfYourEvent"], "name": "<name>", "type": "string"},
   "key": ["NameOfYourEvent", "<name>"], "value": 1
}
Add this to the reduce section:
{
  "id": "NameOfYourEvent",
  "where": {"key": ["NameOfYourEvent", "<name>"]},
  "key": ["<name>"],
  "value": ["$count"],
  "period": 250
}
See the event section for more information about modifying this file for your application’s needs.
Open the
unity.tsfile available in theweb/publicfolder.Create a function to send an event object using sendEventObject from the Genvid client:
private onPerformTheEvent(eventContent: string) {
    this.client.sendEventObject({ NameOfYourEvent: eventContent });
}
Open the
index.htmlfile available in theweb/publicfolder.Create a button on the page to use your function.
<button id='myEventButton'>Click to trigger event</button>
Associate the function with the button inside the
unity.tsfile. For example, this accesses the button and adds the functions created previously to it.let eventButton = <HTMLButtonElement>document.querySelector("#" + "myEventButton"); eventButton.addEventListener("click", (_event) => { this.onPerformTheEvent(eventContentToSend); }, false);
Open a command line prompt and go to the Unity sample folder.
Run
py unity.py loadto reload the modifiedevents.jsonfile.Run
py unity.py build webto rebuild the website.
Now you should be able to use event from the website when the stream is running.