Cluster Api integration
This section will cover how to integrate and use the cluster API in the Unity editor.
Files needed for Cluster API
Three files are currently required to be integrated into your project to fully use our Cluster API without issue. If you want to run the current sample, you don’t need to copy the files in the sample. By using unity.py, you can build the project and run it without having to manually copy any file.
GenvidRESTCSharp.dll
This is the file Genvid creates and uses to make all the calls related to RestSharp.
This file needs to be placed inside the Plugins folder of your
project. The command script of the project handles this for you
when you run py unity.py build.
As a developer, you are free to make any call from this dll directly, though we recommend using the C# script created to interact with it.
Newtonsoft.Json.dll
This is a file needed for the GenvidRESTCSharp.dll.
This file needs to be placed inside the Plugins folder of your
project. The command script of the project handles this for you when
you run py unity.py build.
RestSharp.dll
This is a file needed for the GenvidRESTCSharp.dll.
This file needs to be placed inside the Plugins folder of your
project. The command script of the project handles this for you when
you run py unity.py build.
How to use the Cluster API
As long as the dll files are included in your project, you will be able to do the proper call to the GenvidRESTCSharp without any issue. In this section, we cover step-by-step how to make proper call to the API:
BastionClustersApi
- Create a new
Genvid.Consul.Client.
    private static Genvid.Consul.Client _client = null;

    private static Genvid.Consul.Client Consul
    {
        get
        {
            if (_client == null)
            {
                _client = new Genvid.Consul.Client();
            }
            return _client;
        }
    }
- From the Consul client created in the last step, get the service
bastion-api. - Perform a
GetEnumeratoron the service and then get theCurrenton the service. - Assemble into a string:
http://+ the current service ServiceAddress +:the current service ServicePort +/v1
    private static string BastionUrl
    {
        get
        {
            var iservices = Consul.catalog.service("bastion-api");
            var services = iservices.GetEnumerator();
            if (!services.MoveNext())
            {
                projectAvailable = false;
                return "no project loaded";
            }
            else
            {
                projectAvailable = true;
            }
            var service = services.Current;
            return string.Format("http://{0}:{1}/v1", service.ServiceAddress, service.ServicePort);
        }
    }
- Use the string created in the last step to create a new
Genvid.Api.BastionClustersApiobject with the string as a parameter. - With the
Genvid.Api.BastionClustersApiobject, you can access to the clusters available. You need to do agetClusters()on theGenvid.Api.BastionClustersApiobject which return us a list ofGenvid.Model.Bastion.ClusterOperator.
                var tempBastion = new Genvid.Api.BastionClustersApi(BastionUrl);
                listClusterOperator = tempBastion.getClusters();
- Each
Genvid.Model.Bastion.ClusterOperatorin the list contains the same type of structure:
-
ClusterOperator¶ A Cluster from the Bastion-API.
JSON ExampleObject Properties: { "category": "FBDdZXdJSGTqOLbftfbk", "instanceID": "WevRSKCHutgeIarAGQit", "source": "WbjaJynLIyDCEaTDFVfG", "id": "QZIbbHsBoGyuTOfAdKCB" }
HealthApi
- Create a new
Genvid.Consul.Client.
    private static Genvid.Consul.Client _client = null;

    private static Genvid.Consul.Client Consul
    {
        get
        {
            if (_client == null)
            {
                _client = new Genvid.Consul.Client();
            }
            return _client;
        }
    }
- From the Consul client created in the last step, get the service
bastion-api. - Perform a
GetEnumeratoron the service and then get theCurrenton the service. - Assemble into a string:
http://+ the current service ServiceAddress +:the current service ServicePort +/v1/proxy/+ theClusterName +/cluster-api/v1/
    private string ClusterUrl
    {
        get
        {
            var iservices = Consul.catalog.service("bastion-api");
            var services = iservices.GetEnumerator();
            if (!services.MoveNext())
            {
                projectAvailable = false;
                return "no project loaded";
            }
            else
            {
                projectAvailable = true;
            }
            var service = services.Current;
            return string.Format("http://{0}:{1}/v1/proxy/{2}/cluster-api/v1", service.ServiceAddress, service.ServicePort, optionsCluster[currentSelectionCluster]);
        }
    }
- Use the string created in the last step to create a new
Genvid.Api.HealthApiobject with the string as a parameter.
6) With the Genvid.Api.HealthApi object, you can access to the service health of your choice.
In our case, we want to access the SDK Health check which you you access via getServiceHealth and
passing the service name as a parameter.
                    var healthApi = new Genvid.Api.HealthApi(stringCluster);
                    HealthCheckList = healthApi.getServiceHealth("SDK Health check");
7) Afterwards, you can use the Genvid.Api.HealthApi object list to access any data from it. In this
case, we simply need the first element of the list. Also, in the event you want a better format for the
Output string, you can deserialize it as a Genvid.Model.Cluster.HealthCheckOutput. Before attempting
to deserialize the Output string, you need to make sure that Status of the object is set to passing.
                    if (HealthCheckList.Count > 0)
                    {
                        if (HealthCheckList[0].Status == "passing")
                        {
                            currentHealthCheckOutput = Newtonsoft.Json.JsonConvert.DeserializeObject<Genvid.Model.Cluster.HealthCheckOutput>(HealthCheckList[0].Output);
                        }
                        else
                        {
                            currentHealthCheckOutput = null;
                        }
                    }
                    else
                    {
                        currentHealthCheckOutput = null;
                    }
If you want to know more details about the structure contents for the health check, proceed to the Health Checks page and proceed to the SDK Health check section.
JobsApi
- Create a new
Genvid.Consul.Client.
    private static Genvid.Consul.Client _client = null;

    private static Genvid.Consul.Client Consul
    {
        get
        {
            if (_client == null)
            {
                _client = new Genvid.Consul.Client();
            }
            return _client;
        }
    }
- From the Consul client created in the last step, get the service
bastion-api. - Perform a
GetEnumeratoron the service and then get theCurrenton the service. - Assemble into a string:
http://+ the current service ServiceAddress +:the current service ServicePort +/v1/proxy/+ theClusterName +/cluster-api/v1/
    private string ClusterUrl
    {
        get
        {
            var iservices = Consul.catalog.service("bastion-api");
            var services = iservices.GetEnumerator();
            if (!services.MoveNext())
            {
                projectAvailable = false;
                return "no project loaded";
            }
            else
            {
                projectAvailable = true;
            }
            var service = services.Current;
            return string.Format("http://{0}:{1}/v1/proxy/{2}/cluster-api/v1", service.ServiceAddress, service.ServicePort, optionsCluster[currentSelectionCluster]);
        }
    }
- Use the string created in the last step to create a new
Genvid.Api.JobsApiobject with the string as a parameter. - Use the
Genvid.Api.JobsApiobject to perform any task available:startJob(properJobName)orstopJob(properJobName).
    public void connectToWebJobs(int typeExecution, string jobName)
    {
        var api = new Genvid.Api.JobsApi(ClusterUrl);

        if (typeExecution == 0)
        {
            api.startJob(jobName);
            UnityEngine.Debug.Log(jobName + " is started !");
        }
        else if (typeExecution == 1)
        {
            api.stopJob(jobName);
            UnityEngine.Debug.Log(jobName + " is stopped !");
        }
    }
LinksApi
- Create a new
Genvid.Consul.Client.
    private static Genvid.Consul.Client _client = null;

    private static Genvid.Consul.Client Consul
    {
        get
        {
            if (_client == null)
            {
                _client = new Genvid.Consul.Client();
            }
            return _client;
        }
    }
- From the Consul client created in the last step, get the service
bastion-api. - Perform a
GetEnumeratoron the service and then get theCurrenton the service. - Assemble into a string:
http://+ the current service ServiceAddress +:the current service ServicePort +/v1/proxy/+ theClusterName +/cluster-api/v1/
    private string ClusterUrl
    {
        get
        {
            var iservices = Consul.catalog.service("bastion-api");
            var services = iservices.GetEnumerator();
            if (!services.MoveNext())
            {
                projectAvailable = false;
                return "no project loaded";
            }
            else
            {
                projectAvailable = true;
            }
            var service = services.Current;
            return string.Format("http://{0}:{1}/v1/proxy/{2}/cluster-api/v1", service.ServiceAddress, service.ServicePort, optionsCluster[currentSelectionCluster]);
        }
    }
- Use the string created in the last step to create a new
Genvid.Api.LinksApiobject with the string as a parameter. - Use the
Genvid.Api.LinksApiobject to perform agetLinkswith the proper category and properJobName as parameter. - Perform an
Application.OpenUrlon the.hreffor each object of the list returned.
    public void openLink(string name, string category = "")
    {
        var api = new Genvid.Api.LinksApi(ClusterUrl);

        var links = api.getLinks(category, name);
        foreach (var link in links)
        {
            UnityEngine.Debug.Log(string.Format("Opening {0} at {1}", link.name, link.href));
            Application.OpenURL(link.href);
        }
    }
SettingsApi
- Create a new
Genvid.Consul.Client.
    private static Genvid.Consul.Client _client = null;

    private static Genvid.Consul.Client Consul
    {
        get
        {
            if (_client == null)
            {
                _client = new Genvid.Consul.Client();
            }
            return _client;
        }
    }
- From the Consul client created in the last step, get the service
bastion-api. - Perform a
GetEnumeratoron the service and then get theCurrenton the service. - Assemble into a string:
http://+ the current service ServiceAddress +:the current service ServicePort +/v1/proxy/+ theClusterName +/cluster-api/v1/
    private string ClusterUrl
    {
        get
        {
            var iservices = Consul.catalog.service("bastion-api");
            var services = iservices.GetEnumerator();
            if (!services.MoveNext())
            {
                projectAvailable = false;
                return "no project loaded";
            }
            else
            {
                projectAvailable = true;
            }
            var service = services.Current;
            return string.Format("http://{0}:{1}/v1/proxy/{2}/cluster-api/v1", service.ServiceAddress, service.ServicePort, optionsCluster[currentSelectionCluster]);
        }
    }
- Use the string created in the last step to create a new
Genvid.Api.SettingsApiobject with the string as a parameter. - Use the
Genvid.Api.SettingsApiobject to perform agetSettingswhich returns aGenvid.Model.Cluster.Settingsobject available to be used.
    private void loadSettings()
    {
        var tempSettings = new Genvid.Api.SettingsApi(ClusterUrl).getSettings();
        var tempSettingsProperties = tempSettings.GetType().GetProperties();

        if (oldSettingsLoaded == null || compareSettings(tempSettingsProperties, tempSettings, oldSettingsToSendLoaded, oldSettingsLoaded) == false)
        {
            oldSettingsLoaded = tempSettings;
            oldSettingsToSendLoaded = oldSettingsLoaded.GetType().GetProperties();
            var tempSettingsNew = new Genvid.Api.SettingsApi(ClusterUrl).getSettings();
            var tempSettingsPropertiesNew = tempSettingsNew.GetType().GetProperties();
            newSettings = tempSettingsNew;
            settingsToSend = tempSettingsPropertiesNew;
        }
    }
- Otherwise, you can also use the
Genvid.Api.SettingsApiobject to perform asetSettingswith aGenvid.Model.Cluster.Settingsobject as a parameter to save your settings.
    public void saveSettings(Genvid.Model.Cluster.Settings newSettings)
    {
        var api = new Genvid.Api.SettingsApi(ClusterUrl);

        api.setSettings(newSettings);
    }
Genvid window usage
Warning
This feature is currently in beta. The window is functional, but we expect to make some changes in the future to improve the user experience with more features also. Your feedback on this process is welcome.
A Genvid window is now available in the Window dropdown menu. This menu is available only if the
files from Cluster-API are integrated into your project along GenvidWindow.cs as indicated
at the top of this page.
To be able to see the content in this window, your Genvid Bastion must be set up, and the Unity project loaded as explained previously. This will give you some direct access to the different websites available, as well as the ability to control some of the jobs running in the local cluster.
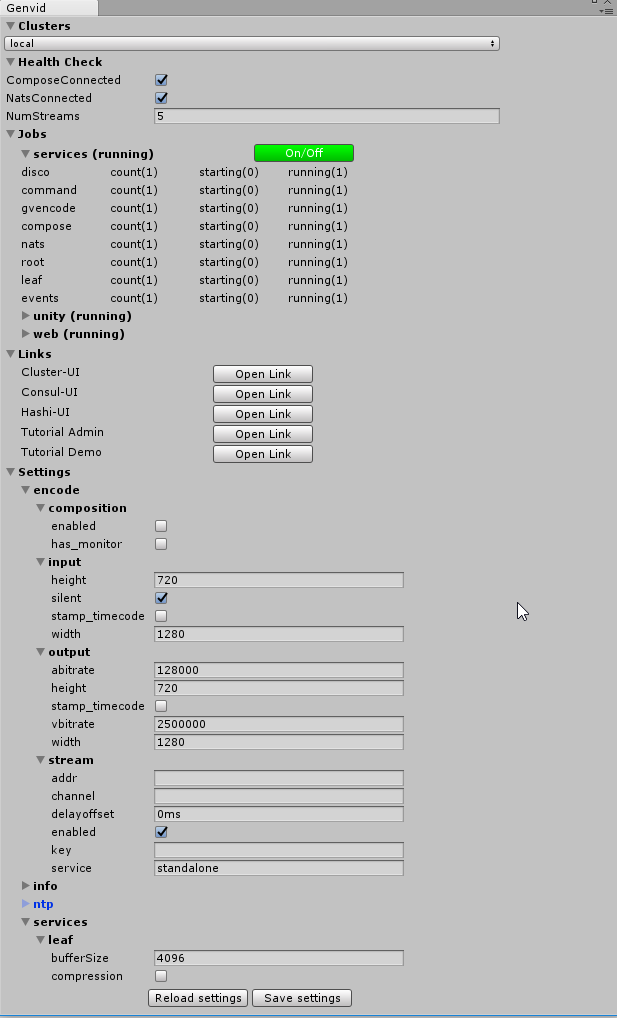
Fig. 14 The Genvid Window for Cluster API inside the Unity Editor
The following sections give more details on each portion on the window and their usage.
Clusters
All the clusters currently available for the project are displayed in a combo list. Local is selected by default. Make sure to select the proper cluster when using the SDK with this window.
Health check
In this section, we are displaying the content of the Genvid.Model.Cluster.HealthCheckOutput.State
from the service SDK Health check. This contents contains:
- ComposeConnected which is the Compose connection status.
- NatsConnected which is the Nats connection status.
- NumStreams which is the number of streams connected.
This section will only appears when the game is running, otherwise an error message will be displayed as: No project currently running.
Jobs
All the jobs available for your project are listed with a foldout. Opening the foldout displays a
button with On/Off on it. This button is green when the job is activated and red when deactivated.
You can click on it to start or stop a job. All the tasks associated with the jobs are listed in the
foldout when a job is active.
Links
All the links available for your project are listed with a button. When the button displays
Open Link, click the button to open the link. When the button displays Error,
clicking the button to display the error in the Console. Sometimes a link is associated with a
job, so make sure to start the job to be able to use the link properly. (For example, in our Unity sample
the Tutorial Admin and Tutorial Demo links will not work unless the Web job is started).
Settings
All the settings associated with the project are listed within different foldouts. You can modify
the settings by changing their value either via a textbox or checkbox. Note that it is not possible
to write characters into a field that contains only numbers. Two buttons are available at the bottom of the
page: Reload settings is for reloading the settings (in case you made some mistakes that you want to revert)
and Save Settings is for saving the changes made to the settings inside this window.
See the The Genvid Settings section for more information about each setting.