Tutorial Sample Website
For the tutorial website, we have opted to use Node.js for the server, and rely on AngularJS 1.5 for the front-end. We also decided to use TypeScript throughout our code in order to benefit from type checking.
In this section, we will only describe the parts of the code that link each component with the Genvid Web API.
Server Code
The server is written using Node.js, and is responsible for connecting some public URLs to the internal Genvid Services.
All of this re-routing is specified in the routes/streams.t.ts file.
This file is responsible for forwarding web requests from the client to
the disco service using a pre-determined secret.
We discover the url and secret of the disco and commands services using consul.
The config.ts file shows how to discover those services.
// Copyright 2016-2017 Genvid Technologies LLC All Rights Reserved.
let envs = require("envs");
import * as Consul from "consul";

let consul_addr = envs("CONSUL_HTTP_ADDR", "127.0.0.1:8500").split(":");
let port = consul_addr.pop()
let host = consul_addr.join(":")
let consul = Consul({host: host, port: port});

export let disco_url = envs("GENVID_DISCO_URL", "http://localhost:8080");
export let disco_secret = envs("GENVID_DISCO_SECRET", "secretcode");

export let command_url = envs("GENVID_COMMAND_URL", "http://localhost:8089");
export let command_secret = envs("GENVID_COMMAND_SECRET", "secretcodecommand");

export interface ITaggedAddresses {
    lan: string;
    wan: string;
}

export interface IServiceNode {
    Node: string;
    Address: string;
    TaggedAddresses: ITaggedAddresses;
    ServiceID: string;
    ServiceName: string;
    ServiceTags: any[];
    ServiceAddress: string;
    ServicePort: number;
    ServiceEnableTagOverride: boolean;
    CreateIndex: number;
    ModifyIndex: number;
}

function watchService(serviceName: string, setUrl: (url: string) => void) {
    let nodesOptions: Consul.Catalog.Service.NodesOptions = {
        service: serviceName,
    };

    let serviceWatch = consul.watch({
        method: consul.catalog.service.nodes,
        options: nodesOptions,
    });

    serviceWatch.on("change", (nodes: IServiceNode[], _res) => {
        if (nodes.length === 0) {
            console.error(`${serviceName} service is not available from consul`);
        } else {
            let node = nodes[0];
            // Use the first disco service
            let serviceUrl = `http://${node.ServiceAddress}:${node.ServicePort}`;
            setUrl(serviceUrl);
            console.info(`Watch ${serviceName} url: ${serviceUrl}`);
        }
    });

    serviceWatch.on("error", (err) => {
        console.error(`${serviceName} watch error:`, err);
    });
}

watchService("disco", (url) => { disco_url = url; });
watchService("command", (url) => { command_url = url; });
The server is forwarding 3 methods.
- /api/streams => /disco/stream/info
This method is used to get information about the current stream. This is how the browser is able to get the stream name, description, channel, etc.
- /api/channels/join => /disco/stream/join
This web method returns an uri and a token used to connect to the Genvid system.
- /api/commands/game
This web method is used to send commands to the game. In this tutorial, the method can be accessed in the admin page and is protected by a password.
The user and password are configured in the utils/auth.ts file.
Browser Code
The browser code relies on AngularJS 1.5. The result looks like this:
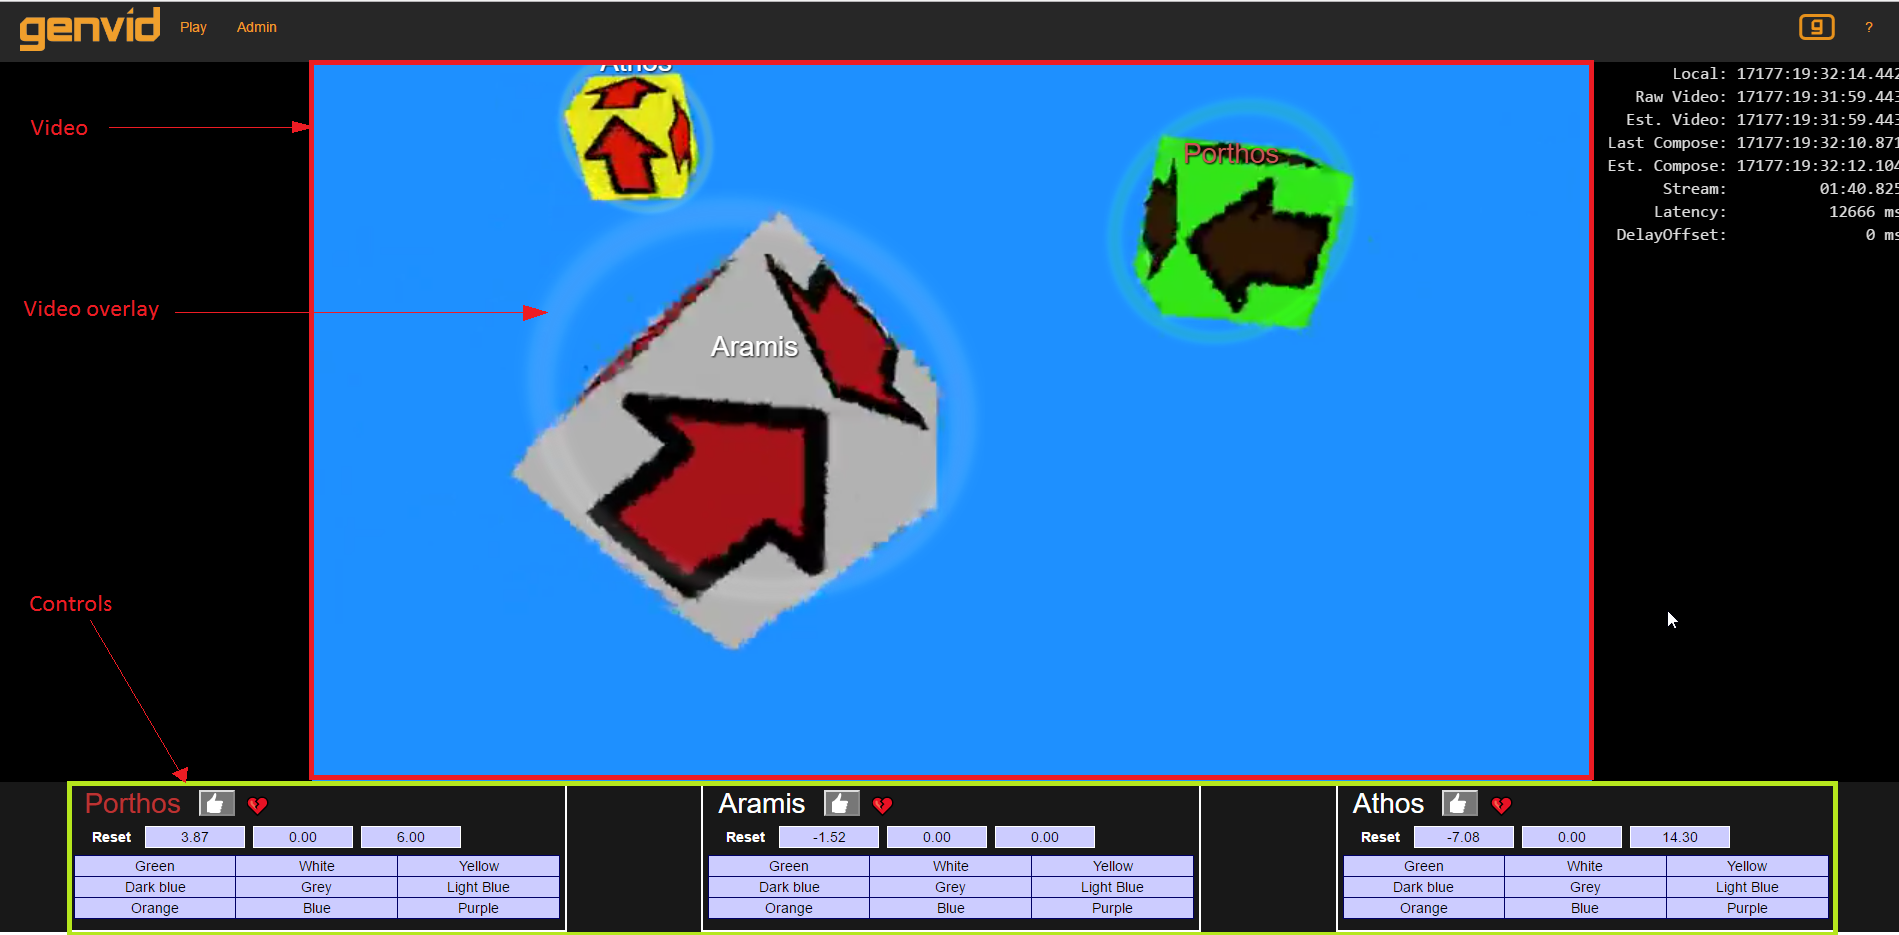
It is a simple web application showing a live video of colored cubes. This application is also compatible with multistreams so you can give a try at using picture in picture composition (see the Genvid Studio sample). There is a video overlay showing circles around the cubes. The positions of the circles are matching the position of the cubes in the video. The user is able to interact with the webpage directly with these controls:
Global:
- M = Mute or unmute the stream
- Z = Reduce volume of the stream
- X = Increase volume of the stream
- Space = Pause or unpause the stream
- Plus = Increase the DelayOffset
- Minus = Decrease the DelayOffset
- Multiply = Reset the DelayOffset
- G = Show or hide the Genvid overlay
- H = Open or close the help menu
Video:
- Click on cube = Panel highlight and circle brighter
Header Buttons:
- Play = Return to the interactive video player
- Admin = Access the admin page (u: admin p: admin)
- Genvid icon button = Show or hide the Genvid overlay
- ? = Open or close the help menu
Bottom panels:
- Click 👍 = Change player popularity (heart icon)
- Click reset = Reset cube position
- Click color = Change cube color
The Genvid overlay is used to prevent interaction with the Youtube player, but it is also used to display the colored circles and names beside the cube. The overlay is also used to display useful debug information:
- Local: Local time of the machine displaying the webpage
- Raw Video: Current internal time of the video player
- Est. Video: Estimated video player time
- Last Compose: Time of the last data reported by the Compose service
- Est. Compose: Estimated time of the Compose service
- Stream: Current time of the generalized stream
- Latency: Estimated latency between the game and the spectators
- DelayOffset: Optional delay offset used for minute synchronization adjustments
The admin page can be accessed with the Admin button. The current login is admin and the password is admin. The page allows the admin to use the command channel. Currently, the page is divided with a section for each cube and containing these specific functionalities:
- Direction - Click on any arrow to change the cube direction
- Reset - Click to reset the position of the cube
- Slower - Click to reduce the speed of the cube
- Faster - Click to increase the speed of the cube
channelComponent.ts
The front-end code must instantiate a GenvidClient instance.
This is done in the public/lib/channelComponent.ts file, after it
has retrieved the stream info on /api/streams and made a join
request on /api/channels/join.
The GenvidClient communicates with the genvid services and provides
a few important callbacks.
onVideoPlayerReadyis called when the video is readyonAuthenticatedinforms about the success of the authentication.onStreamsReceivedis triggered when stream data is received.onDrawis called periodically to refresh the GUI.
onDraw(frame: genvid.IDataFrame) {
    // update the overlays to adapt to the composition of the video stream:
    this.updateOverlays(frame.compositionData);

    // Parse the JSON from each elements
    let gameData: IGameData = null;
    const gameDataFrame = frame.streams["GameData"];
    if (gameDataFrame && gameDataFrame.user) {
        gameData = gameDataFrame.user;
        // Modify the popularity with the latest value
        for (let cube of gameData.cubes) {
            if (this.latestPopularity) {
                let pCube = this.latestPopularity.find( c => c.name === cube.name );
                if (pCube) {
                    cube.popularity = pCube.popularity;
                }
            }
        }
    }

    // Send the data to the overlay and controls
    this.overlay.drawFrame(gameData);
    if (this.onChannelDraw) {
        this.onChannelDraw(gameData);
    }

    // Log the annotations
    const colorChangedAnnotation = frame.annotations["ColorChanged"];
    if (colorChangedAnnotation) {
        for (let annotation of colorChangedAnnotation) {
            let colorChanges = <IGameChangeColorAnnotation[]>annotation.user;
            for (let colorChange of colorChanges) {
                console.info(`The cube ${colorChange.name} changed color.`);
            }
        }
    }
}
tutorialOverlay.ts
The file public/lib/tutorialOverlay.ts shows how to read the game
data as well as gives an example on how to use this information to
render 3D circles in a WebGL canvas.
tutorialControlsComponent.ts
This file shows how to generate events, such as changing a cube’s color, cheering for a cube or resetting its position.
For example, the following code demonstrates how to change the color with an event.
onColorChange(event: UIEvent, name: string, color: string) {
    event.stopPropagation();
    let evt = {
        key: ["changeColor", name],
        value: color,
    };
    this.parent.client.sendEvent([evt]);
}
The html is contained in the files
public/lib/components/tutorialControls.htmlpublic/lib/components/tutorialCubeControl.html
adminComponent.ts
This file shows how to send commands to the game with the command channel. The admin user can change the speed and direction of the cubes.
Because the commands are controlling the game, the admin page needs authentication. The user provided are:
| admin | admin |
| user1 | user1 |
| user2 | user2 |