Twitch Extension Code Reference
For the sample Twitch extension, we opted to write the client code exclusively in JavaScript to simplify the example. In this section, we describe the Twitch extension code and the code used to connect to it.
In This Section
Server Code
The server responsible for connecting public URLs to internal Genvid Services is what the Twitch documentation refers to as the Extension Backend Service (EBS).
We wrote the server code in the Web Sample, using Node.js. It uses the cross-origin resource sharing (CORS) library.
// Only to use in a development environment, not in a production environment. This removes the security purpose of CORS
app.use(cors({ credentials: true, origin: true }));
In the web sample, the server forwards 3 methods:
- /api/streams =>
GET /disco/stream/info - This method gets information about the current stream (name, description, channel, etc.).
- /api/channels/join =>
POST /disco/stream/join - This method returns a URI and a token used to connect to the Genvid EBS.
- /api/commands/game =>
POST /commands/game This web method sends commands to the game.
In this sample, you can access the method from the live configuration panel of your Twitch Dashboard. The Genvid EBS protects the API calls by validating of the user/viewer JSON Web Token (JWT) sent to it.
The JWT is decoded using the clientId of the Twitch extension. Once validated and verified, the viewer/user becomes the broadcaster where the extension is installed.
The web/backend/auth.js file contains the verification method.
/**
 * Validate Twitch Authentication
 * @param req
 * @param res
 * @param next
 */
module.exports.twitchAuth = function (req, res, next) {
    let token = req.headers['x-access-token'] || req.headers['authorization'];
    if (token.search('Bearer ') === 0) {
        // Remove Bearer from string
        token = token.slice(7, token.length);
        console.log('token', token);
    }

    if (token) {
        jwt.verify(token, Buffer.from(config.webEndpointConfig.secret, 'base64'), (err, decoded) => {
            if (err) {
                return res.status(401).send();
            } else {
                if (decoded.role === 'broadcaster') {
                    return next();
                } else {
                    return res.status(401).send();
                }
            }
        });
    } else {
        return res.status(401).send();
    }
}
Twitch Extension Code
The Twitch Extension is a simple web application showing a live video of colored cubes. It is also compatible with multistreams, so you can try using picture-in-picture composition. (See the Genvid Studio Service section for more information.) There is a video overlay showing circles around the cubes. The positions of the circles match the position of the cubes in the video.
The extension code is also written exclusively in JavaScript.
Video Overlay
The video overlay (video_overlay.html) extension renders on top of
the video player as a transparent overlay. It’s only viewable when the channel
is live.
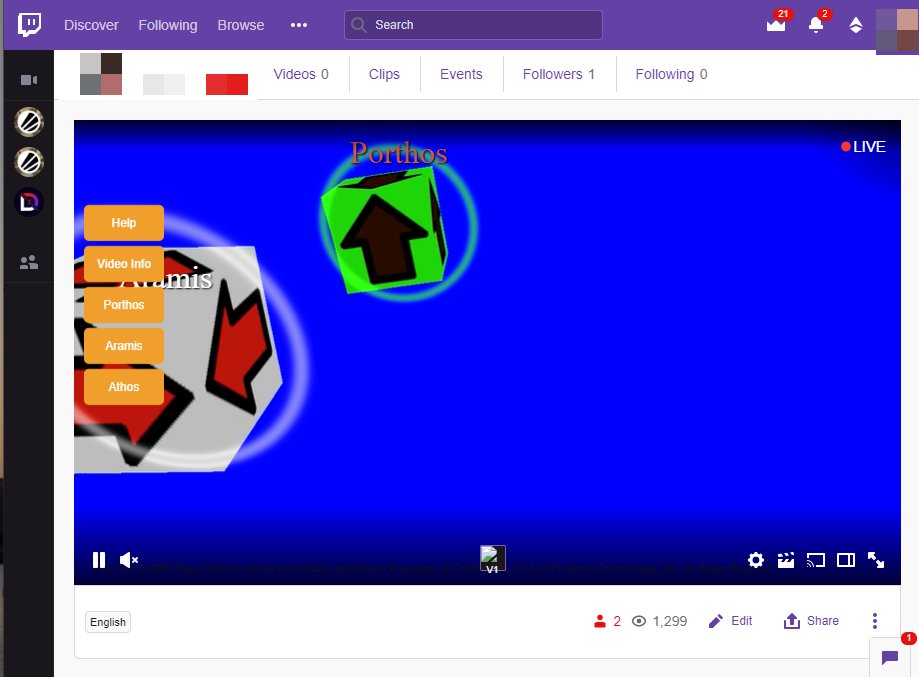
The overlay inlcudes the controls that allow the user to interact with the stream. For the DirectX Sample, those controls include the following:
Toolbar Buttons:
- Help = Open or close the help menu.
- Video info = Open or close the video info panel.
- Cube name buttons = Open or close the cube control panel.
Video:
- Click on cube = circle gets brighter
Cube panels:
- Cheer = Change player popularity (heart icon).
- Reset = Reset cube position.
- Color = Change cube color.
The Genvid overlay prevents direct interaction with the Twitch player. It also displays the colored circles and names beside each cube along with useful debug information when you click on the Video Info button.
- Local = Local time of the machine displaying the webpage.
- Est. Video = Estimated video-player time.
- Stream received = Time of the last data reported by the Compose service.
- Stream played = Current time of the generalized stream.
- Latency = Estimated latency between the game and the spectators.
- DelayOffset = Optional delay offset used for minute synchronization adjustments.
viewer.js
The front-end code in viewer.js performs several required functions:
- Validates that you are an authorized Twitch user (
twitch.ext.onAuthorized).- Retrieves the URL Endpoint of the Genvid EBS from the Twitch Configuration Service.
- Makes a join request on
/api/public/channels/jointo retrieve the stream info and authorization token.- Instantiates a GenvidClient with the stream info.
/**
 * 1- Validate that viewer is authorized to use a twitch extension
 * 2- Retrieve the endpoint of the cluster from Twitch Configuration Service
 * 3- Initiate Genvid Services...
 */
window.Twitch.ext.onAuthorized((auth) => {
    // save our credentials
    token = auth.token;
    tuid = auth.userId;

    const endpoint = getEndpoint();
    if(endpoint){
        getStreamInfo(endpoint);
    }
});
The IGenvidClient() in our web API communicates with the Genvid
services and provides a few important callbacks.
onAuthenticated()informs about the success of the authentication.onStreamsReceived()is triggered when stream data is received.onDraw()is called periodically to refresh the GUI.onVideoPlayerReady()is called when the video is ready.
/**
 * Callback called regurlary to draw the overlay,
 * in sync with the video frame displayed.
 * @param {*} frameSource
 */
const onDraw = frameSource => {

    // update the overlays to adapt to the composition of the video stream:
    updateOverlays(frameSource.compositionData);

    // Get the background session ID
    let backgroundSessionID = Object.keys(frameSource.sessions)[0];
    if (frameSource.compositionData[0]) {
        backgroundSessionID = frameSource.compositionData[0].sessionId;
    }

    // Assign backgroundSession by default.
    let targetSession = frameSource.sessions[backgroundSessionID];
    if (targetSession && Object.keys(targetSession.streams).length > 0) {
        videoOverlay.style.display = "block";
        // Extract positions, colors, and camera data.
        updateStreamsInfoFromSession(targetSession);
    } else {
        videoOverlay.style.display = "none";
    }
    // Set circles colors to newly received ones.
    updateCubeColors();
    // Update UI with steam info from GenvidClient.
    updateInfo();

    if (isFullScreen !== checkFullScreen()) {
        isFullScreen = checkFullScreen();
    }
}
In this sample, we use the onDisconnect()
callback (exposed by the IGenvidClient() interface) to
notify us when the client’s socket closes.
We begin by binding our desired callback.
genvidClient.onDisconnect(() => {onDisconnectDetected();});
Next we instruct the script to launch reconnection attempts when we’re notified the client socket closed.
/**
 * Method triggered when a disconnected socket occured  We then initiate
 * a client reconnect
 */
const onDisconnectDetected = () => {
    logger.log('got disconnected, reconnect...');
    const endpoint = getEndpoint();
    if(endpoint){
        getStreamInfo(endpoint).then((streamInfo) => {
            genvidClient.reconnect(
                streamInfo.info,
                streamInfo.uri,
                streamInfo.token,
            )
        });
    }
}
Then we launch an information request asking for a new leaf address, a new token, and new streamInfo.
If the request succeeds, we call
reconnect() to establish a new websocket
connection using the above information.
If the request fails (for example, if there is no leaf available), we wait and retry. We determine the waiting period using the result of an incremental Fibonacci operation.
/**
 * GENVID - Start sleep
 * @param {*} ms
 */
const sleep = (ms) => {
    return new Promise(resolve => setTimeout(resolve, ms));
}
Note that we add a ten-percent randomness factor to the result of the Fibonacci sequence. This avoids cases where two services launch connection attempts simultaneously. We reset the Fibonacci values on a successful connection.
Overlay Methods
The Overlay Methods section is where we query and initialize html element references. It is also where we call initThreeJS to start updating the scene.
initThreeJS
The initThreeJS uses Three.js to create references to the scene, canvas, perspective camera, and renderer we’ll need to present the game data. It then launches a rendering sequence by calling render.
render
The render function is used to update the scene with newly received game data. Once we receive the cube names, we create the corresponding cube tags and circle sprites. This part is only called once. Next, we update the camera object and cube positions with newly received data from the “Camera” and “Positions” data streams. Three.js uses such info as the fov, aspect ratio, cube positions, etc. to present that data in 2D space to overlay the video. The positon data is also used to update the player pannel. Finally, we call requestAnimationFrame with the render function as the argument to keep updating the scene.
User Interaction
The User Interaction section defines how users can interact with the overlay and generates events, such as changing a cube’s color, cheering for a cube, or resetting it’s position.
For example, in order to change a cube’s color, we construct an event object with a key and a value. The key contains the action and the cube id. The value contains the color. We then pass that object to genvidClient.sendEvent to send the event.
Dashboard (Live Config) Panel
The Live Configuration Panel (live_config.html)
is how you access the Command Channel. It appears in
the panel area on the dashboard page for the installed extension.
From your Twitch Account:
Select Creator Dashboard.
In the Extensions section, activate your panel.
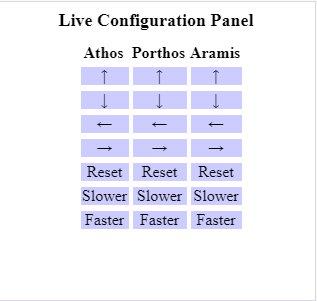
The panel shows a section for each cube and includes the following functions:
- Direction = Click on any arrow to change the cube direction.
- Reset = Reset the position of the cube.
- Slower = Reduce the speed of the cube.
- Faster = Increase the speed of the cube.
live_config.js
The live_config.js file sends commands to the game via the
command channel. This is how the
broadcaster changes the speed and direction of the cubes.
Because the commands control the game directly, only the broadcaster should have access to the command API. With every request, we send the Bearer Token (JWT) of the user to our EBS to validate that the user is a valid Twitch user and also the broadcaster.
For example, the following code demonstrates how to change the direction or a cube.
/**
 * Change the direction of the cube
 * @param {*} cubeName
 * @param {*} x
 * @param {*} z
 */
const setDirection = (cubeName, x, z) => {

    let command = {
        id: "direction",
        value: `${cubeName}:${x}:0:${z}`
    };
    twitch.rig.log("command", command);
    const fetchOptions = {
        method: "POST",
        headers: headers, // Contains the Bearer token
        body: JSON.stringify(command)
    };
    fetch(commandApiEndpoint, fetchOptions)
        .then(data => {
            console.log('data', data);
            message = `Set direction to ${cubeName}:${x}:${z}`;
            displayMessage();
        })
        .catch(err => {
            message = `Failed with error ${err} to do Set direction to ${cubeName}:${x}:${z}`;
            console.log('err', err);
            displayErrorMessage();
        });
}
The web/backend/auth.js file performs validation for our Node.js server
(EBS).
/**
 * Validate Twitch Authentication
 * @param req
 * @param res
 * @param next
 */
module.exports.twitchAuth = function (req, res, next) {
    let token = req.headers['x-access-token'] || req.headers['authorization'];
    if (token.search('Bearer ') === 0) {
        // Remove Bearer from string
        token = token.slice(7, token.length);
        console.log('token', token);
    }

    if (token) {
        jwt.verify(token, Buffer.from(config.webEndpointConfig.secret, 'base64'), (err, decoded) => {
            if (err) {
                return res.status(401).send();
            } else {
                if (decoded.role === 'broadcaster') {
                    return next();
                } else {
                    return res.status(401).send();
                }
            }
        });
    } else {
        return res.status(401).send();
    }
}
Configuration Page
The Configuration Page lets you store persistent per-channel and per-extension data. It provides that data to your frontend on extension startup.
In our case, we use it to store the API Endpoint of our Node.js server (EBS).
config.js
The config.js file is where we retrieve form information and save it
to the Twitch Configuration Service.
/* Quick and dirty binding form to twitch extension configuration */
const GvBindTwitchConfig = (form, twitchExtConfiguration) => {

    // On Submit, serialize form values into Twitch
    form.addEventListener("submit", function (e) {
        var configuration = GvSerializeForm(form);
        twitchExtConfiguration.set('broadcaster', '1.0', configuration);

        const msg = document.getElementById("message");
        if (msg.classList.contains('gv-displaynone')) {
            msg.classList.remove('gv-displaynone');
        }

        e.preventDefault();    //stop form from submitting
    });

    // On Load, deserialize Twitch configuration into form values
    var content = twitchExtConfiguration.broadcaster ? twitchExtConfiguration.broadcaster.content : {};
    GvDeserializeForm(form, content);
}