The Genvid Window
Note
This feature is currently in beta. The window is functional, but we expect to make some changes in the future to add new features and improve the user experience. We welcome your feedback on the process.
The Genvid window becomes available in the Window dropdown-menu of the Unity editor after installing the Genvid Editor package.
The following sections give more details on each section of the window and their functions.
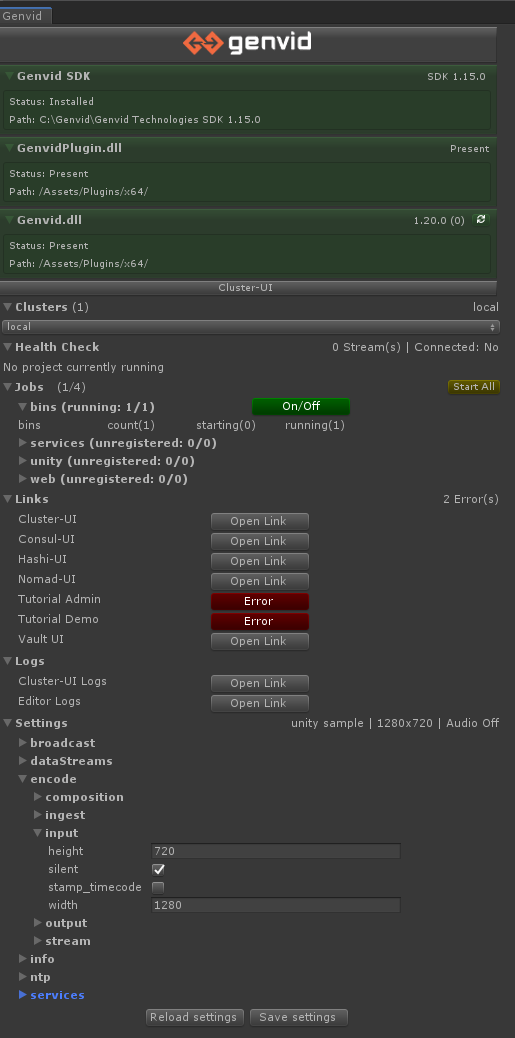
Parts of the Genvid Window
Genvid SDK
We display information on the Genvid SDK installation. If the Genvid SDK is installed, the Genvid SDK version is also displayed. You can access the Genvid SDK folder by clicking on the path displayed. In case that you are missing the Genvid SDK, you can also click on the Genvid button the Genvid Technologies website.
GenvidPlugin.dll
We display information related to the GenvidPlugin.dll presence in your project.
Genvid.dll
We display information related to the Genvid.dll library, namely, its location and version, if available. You can refresh this information manually.
Clusters
We display all the clusters currently available for the project in a combo list. < Select a Cluster > is the default selection. The number of clusters available is displayed beside the foldout. Make sure to select the proper cluster when using the SDK with this window.
Health Check
In this section, we describe the content of the
Genvid.Model.Cluster.HealthCheckOutput.State from the service
SDK Health check. The contents include:
ComposeConnected is the Compose connection status.
NatsConnected is the NATS connection status.
NumStreams is the number of streams connected.
This section only appears when the game is running, otherwise it displays
the message No project currently running. At the top of this
section, there is a summary of the number of streams active and if both
Compose and NATS are connected.
Jobs
A foldout lists all the jobs available for your project along a Start All button. Opening the foldout displays a button labeled On/Off. The button is green when the job is activated and red when deactivated.
Click on the button to start or stop a job. All the tasks associated with the jobs are listed in the foldout when a job is active.
Links
All the links available for your project are listed with a button. When the button displays Open Link, click the button to open the link. When the button displays Error, clicking the button to display the error in the Console.
If a link is associated with a job, you need to start the job to use the link properly. For example, in our Unity sample the Cube Admin and CUBE SAMPLE links won’t work unless the Web job is running.
Logs
This section only include a button Open Link and upon clicking on it, the logs page is displayed.
Settings
All the settings associated with the project are listed within different
foldouts. Beside the foldout, we have the info.name, the
encode.output.width, the encode.output.height and the audio status
encode.input.silent. You can modify the settings by changing their value
either via a textbox or checkbox.
Note: You can’t write characters in a field that only contains numbers.
There are two buttons available at the bottom of the page:
- Reload settings reloads the settings (useful for reverting
incorrect settings).
- Save Settings saves changes to the settings made in this
window.
See The Genvid Settings for more information about each setting.